(Last updated on January 9th, 2023)
A lot of times, the very thing that is meant to protect you and keep you sane, can be the reason to drive you nuts. It can certainly happen in the case of Windows Defender at times.
Windows Defender is the antivirus security suite that comes built-in with Microsoft Windows Operating System. If you’re not using a premium antivirus software, this suite can be useful in keeping you safe against a host of malware and cyber threats.
Especially if you download something using Microsoft Edge, your Windows Defender will scan it to make sure it’s not malicious. However, there may still be reasons to turn off Windows Defender temporarily.
Being an in-built program, you don’t have the option to uninstall Windows Defender. That’s why you have to manually disable it, which can be done using a variety of methods.
Reasons Why you may have to Turn Off Windows Defender
So, let’s first go over a few situations where it becomes necessary to turn off or disable Windows Defender. For instance:
If you want to install another antivirus program, you must first disable Windows Defender. If you don’t do that, a number of things can go wrong.
- Your new antivirus software may not install properly.
- The new antivirus software and Windows Defender may recognize each other as malicious or harmful code as well. And there’ll be a never-ending clash between the two resulting in both apps not being able to run optimally.
- In some cases, this can also lead to Windows failing to install important updates.
So, despite all of its goodness, there are sometimes good reasons to disable Windows Defender. But this is always temporary, and you can turn it back on whenever the need be.
Turn off Windows Defender Temporarily
If it’s one or two specific tasks that require you to shut off Windows Defender, a temporary solution will suffice.
Turn off Windows Defender using the Settings App (For Windows 10)
This is the quickest way to turn off Windows Defender temporarily. One advantage of using this method is that, if at any time your system appears to be at risk, Windows Defender automatically turns itself back on to scan the issue.
1. Click on the Start Button in the bottom left of the Windows screen, the Start menu will pop up.
2. Click on the Setting icon (the cog). Alternatively, you can access the Settings App from the search bar.
3. In Settings, go to Update & Settings and select.
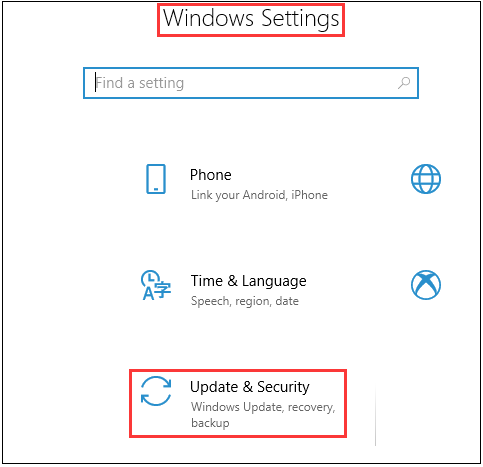
4. On the left-hand side, there’ll be a list of different items — select Windows Security from here.
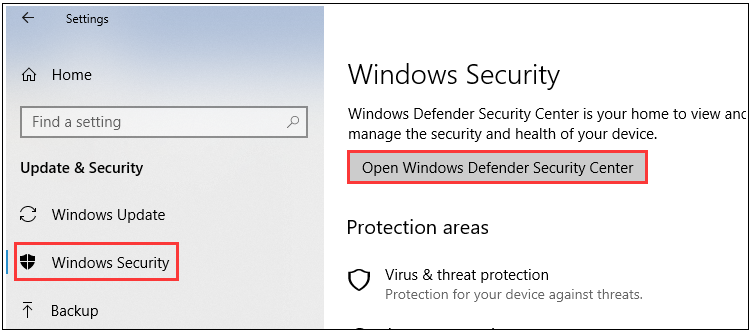
5. Click on Virus & threat protection option under ‘Protection areas’ on the screen side.
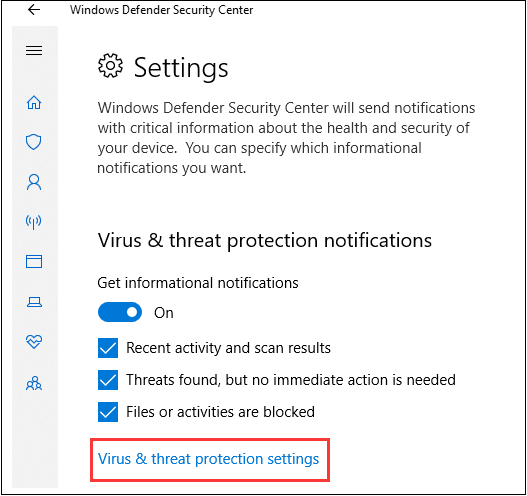
6. Go to Virus & threat protection settings and press Enter.
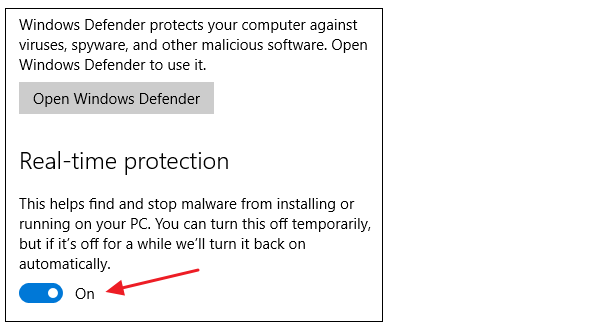
7. You’ll find an On switch under ‘Real-time protection.’ Click on this switch, so it changes to Off.
8. You’ll find an On switch under ‘Real-time protection.’ Click on this switch, so it changes to Off.
9. Restart Windows to apply the new setting.
Turn off Windows Defender in Windows 7/ Windows Vista
If you’re still using an older version of Windows, you’ll have to follow a slightly different method to disable Windows Defender. For instance, here’s what you need to do in the case of Windows 7/ Vista.
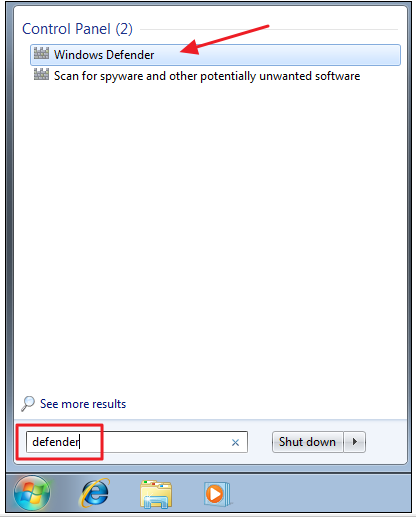
1. Type Control Panel in the search bar and click on Windows Defender.
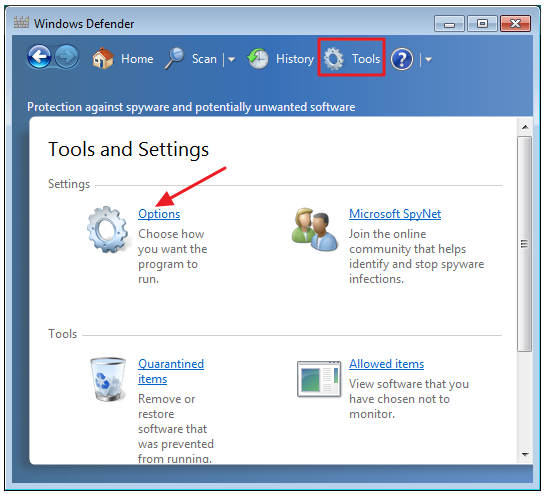
2. Select Tools on this window and then click on Options.
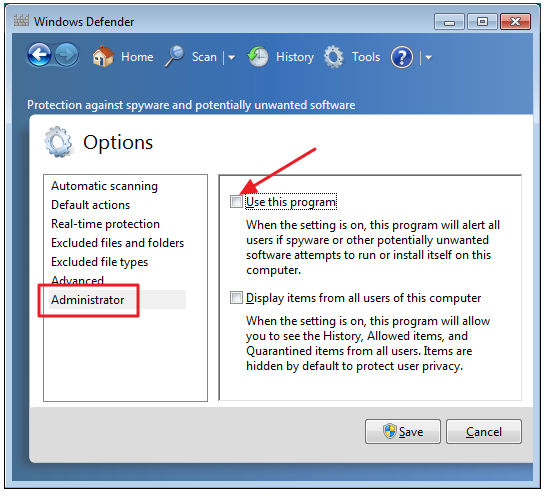
3. Select the Administrator from the items listed on the left side pane.
4. Uncheck the option Use this Program. (In Windows Vista, this option will be “Use Windows Defender”).
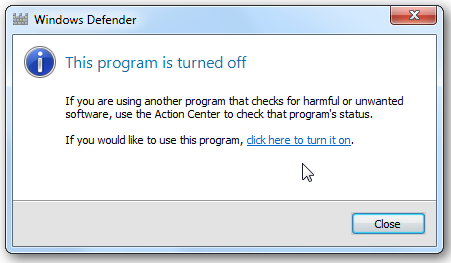
5. Save this setting and then click Close on the next window titled ‘Windows Defender Information.’
6. Restart Windows to apply this new setting.
Turn off Windows Defender Permanently
If you’re looking for a more permanent setting to turn off Windows Defender such that it won’t automatically turn back on. You can do that using the following methods.
Turn Off Windows Defender using the Registry Method
This method will result in disabling Windows Defender for good until you decide to turn it on again, which you’ll have to do manually.
Although, be extra careful using this method as one wrong edit can result in damaging your computer irreversibly. So, it’s a good idea to back up your important information before you go this route.
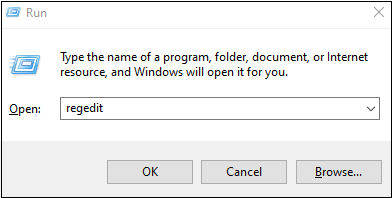
1. Type Run in the ‘Windows Search Bar’ and press Enter. You can also access the ‘Run App’ using the keyboard shortcut: Windows key + R.
2. In the Run command, type regedit and click OK.
3. A pop-up window will appear to verify that you allow this app to make changes to your device. Select Yes.
4. In the window that appears, copy and paste the below-given address path into the search bar and press Enter:
HKEY_LOCAL_MACHINE\SOFTWARE\Policies\Microsoft\Windows Defender
5. Right-click on the Windows Defender folder and click on New in the drop-down menu. Select DWORD (32-bit) Value.

Note: You’ll only need to do this if you don’t find DisableAntiSpyware in the folder. If you do, skip to step 7.
6. Following the above action, a new item will appear in the folder, with its text highlighted. Clear the current text and type DisableAntiSpyware in its place. Click Enter. (The item will be saved in the folder.)
7. Double click on this new item – DisableAntiSpyware. A window will open labeled ‘Edit DWORD (32-bit) Value’. Here, enter 1 in the ‘Value data’ field and click OK.

8. Restart your computer to apply the new setting.
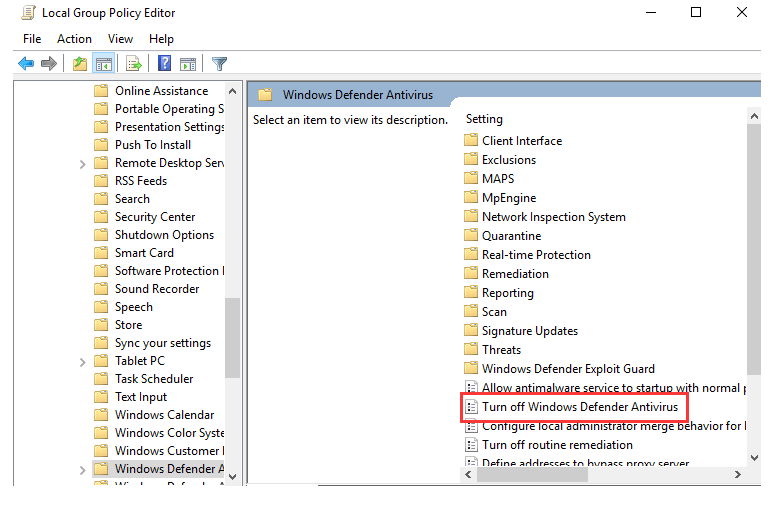
Turn Off Windows Defender using Group Policy
Another similar method to the “Registry approach” is the Group Policy. This method also turns Windows Defender off permanently as long as you don’t manually turn it back on. But this feature is only available for Windows 10 Pro, Windows 10 Enterprise, and Windows 10 Education.
Note: Avoid using this method if you’ve never used Group Policy before. Like the Registry method, one wrong move can result in a major problem here as well.
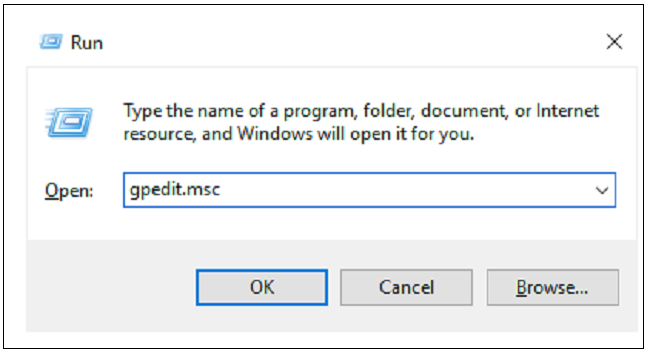
1. Type Run in the ‘Windows Search Bar’ and press Enter. Now type gpedit.msc in the Run window and press Enter.
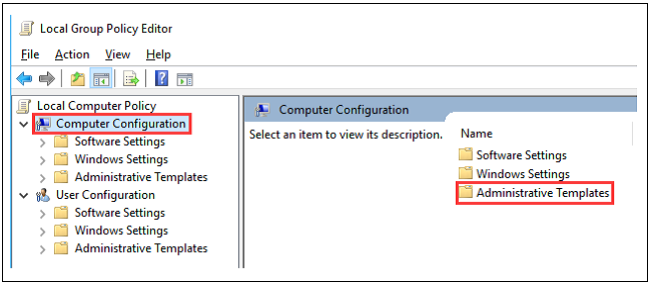
2. Go to Computer Configuration in the left pane and press Enter.
3. Click on Administrative Templates.
4. Click on the Windows Components option on the right-hand side screen.
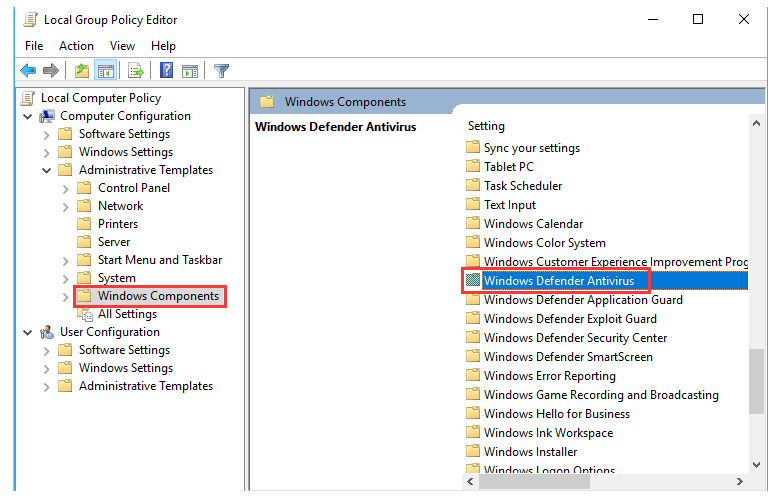
5. A list of items will appear. Scroll down it until you reach Windows Defender Antivirus. Double-click on it.

6. Go to Turn off Windows Defender Antivirus and double-click on it. You’ll find three different options on the left edge of the window. Select Enabled from it and click OK.
A notification will appear to let you know that you don’t have virus protection turned on. This means you’ve successfully turned off Windows Defender. Lastly, restart your device to apply this setting.
Windows Defender Disabled!
All of the above methods will get you the same result. You can use the one that serves you best. However, be careful if you’re turning off Windows Defender for any purpose other than installing third-party antivirus software.
Since now you’re unprotected, be sure to turn your protection back on immediately after you’ve taken care of the task for which you disabled Windows Defender in the first place.

Anas Baig is a consumer privacy advocate and cybersecurity journalist by profession. Has has more than 7 years of professional experience under his belt. Anas has been featured on numerous media publications including The Guardian, Lifehacker, The Next Web, Infosecurity Magazine, Security Boulevard, Hacker Noon, CMS Wire, IAPP, SC Magazine, and many others. His interest includes Digital Privacy Rights, Information Security, Networking, Privacy, and Data Protection.
My Contributions:
Hacker Noon | TheNextWeb | DevOps.com | GlobalSign | CMS Wire | CSO | Tech.co | Security Boulevard | ITProPortal | MuckRack | Crunchbase